Introduction
Injection molding is a highly prevalent manufacturing process used for the mass production of injection molded parts. It involves injecting molten plastic into a mold cavity, allowing it to cool and solidify, and then ejecting the finished part. The success of the injection molding process heavily relies on effective design principles.
Design plays a critical role in injection molding as it directly influences the quality, functionality, and manufacturability of the final product. By carefully considering design aspects, manufacturers can optimize the injection molding process, ensuring the production of high-quality parts that meet the desired specifications.
In the following sections, we will delve into the key considerations and principles of plastic injection molding design. Understanding these fundamentals is crucial for developing successful injection molding processes and achieving consistent, reliable, and cost-effective production.
II. The Fundamentals of Injection Molding.
A. Definition of injection molding and its key elements
Injection molding is a manufacturing process that involves the production of plastic parts by injecting molten plastic material into a mold cavity. The molten plastic is then cooled and solidified to form the desired shape. The key elements of plastic injection molding include:
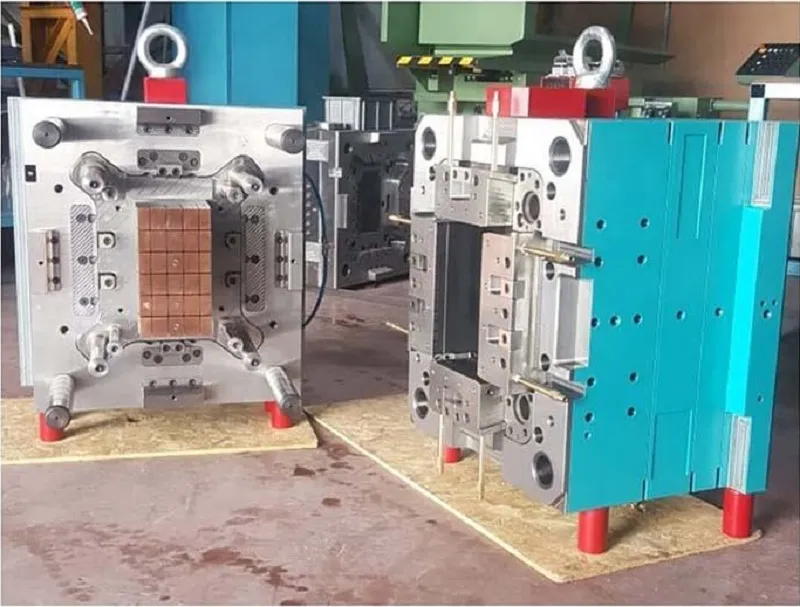
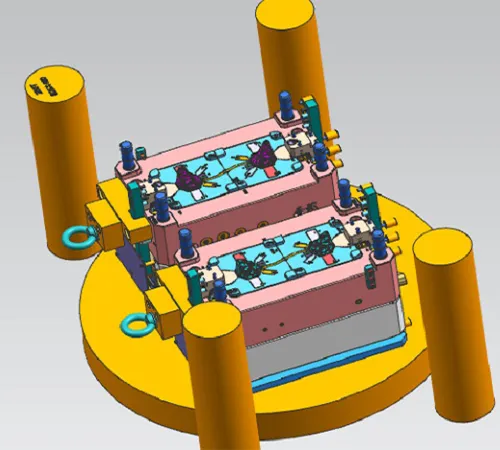
1. Mold:
A mold is a custom-designed tool that consists of two halves, the cavity, and the core, which define the shape of the final part. It is precision-machined to ensure accuracy and consistency in the production of parts.
2. Injection Unit:
The injection unit is responsible for melting the plastic material and injecting it into the mold cavity under high pressure. It consists of a hopper, where plastic pellets are fed, a heating barrel, and a reciprocating screw that moves the molten plastic forward.
3. Clamping Unit:
The clamping unit holds the two halves of the mold together during the injection process. It ensures that the mold remains closed and securely holds the molten plastic in the cavity.
B. Overview of the injection molding process.
The injection molding process typically follows these steps:
1. Mold Preparation:
The mold is prepared by cleaning and lubricating its surfaces to ensure smooth part ejection and prevent defects.
2. Material Loading:
Plastic resin pellets, selected based on their properties and requirements of the part, are fed into the hopper of the injection unit.
3. Melting and Injection:
The plastic pellets are gradually melted and homogenized as they move through the heating barrel. The molten plastic is then injected into the mold cavity under high pressure, filling it completely.
4. Cooling and Solidification:
The molten plastic inside the mold cools and solidifies, taking the shape of the cavity. Cooling time is determined by the material properties and part geometry.
5. Mold Opening and Ejection:
Once the part has solidified, the mold opens, and the ejector pins or plates push the part out of the mold. The part is then collected and prepared for further processing or assembly.
C. Role of material selection in injection molding design.
Material selection is a crucial aspect of plastic injection molding design. The choice of plastic material depends on factors such as desired part characteristics, functional requirements, and environmental considerations. Different materials offer varying properties, including strength, flexibility, heat resistance, and aesthetics.
The material’s melt flow properties and compatibility with the mold surface also influence the plastic injection molding process. Proper material selection ensures optimal part quality, reduces the risk of defects like warping or sink marks, and facilitates efficient molding cycles.
Considering factors such as material behavior during melting, cooling rates, and shrinkage properties helps designers create part designs that are well-suited for the chosen material. Collaborating with material suppliers and conducting thorough material testing is essential to ensure successful plastic injection molding processes.
By understanding the fundamentals of injection molding, including its key elements, the process overview, and the importance of material selection, designers can lay a solid foundation for the design and manufacturing of high-quality injection molded parts.
III. Design Guidelines for the Injection Molding Process.
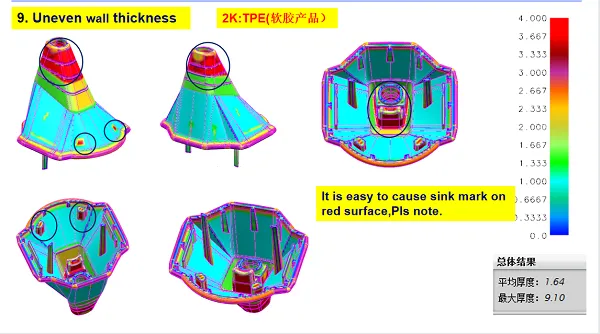
A. Maintaining uniform wall thickness in part design.
One of the crucial design considerations in injection molding is maintaining uniform wall thickness throughout the part. Uniform wall thickness ensures consistent cooling and material flow, leading to a higher-quality finished product. Here are some guidelines to follow:
Avoid thick sections:
Excessive thickness can result in longer cooling times, sink marks, and uneven shrinkage. It is recommended to keep wall thickness as uniform as possible.
Use ribs for added strength:
Instead of increasing wall thickness, incorporate ribs in the design to provide structural support. Ribs distribute stress and improve part strength without compromising uniformity.
Gradual transitions:
When transitioning between different wall thicknesses, ensure a smooth and gradual transition to prevent flow restrictions and potential defects.
B. Proper placement of gate locations.
Gate locations are critical in injection molding design as they determine how molten plastic enters the mold cavity. Correct gate placement facilitates uniform filling, minimizes part defects, and ensures proper material flow. Consider the following guidelines:
Select optimal gate types:
Common gate types include edge gates, hot-tip gates, and tunnel gates. The choice depends on factors such as part geometry, material properties, and aesthetic requirements.
Gate location and part geometry:
Place gates at locations that allow for even distribution of material flow, filling from thick to thin sections, and avoiding trapped air.
Minimize gate vestiges:
Position gates to minimize visible gate marks on the finished part, especially on critical surfaces.
C. Incorporating draft angles for easy ejection.
Draft angles are tapered angles incorporated on the vertical surfaces of the part to facilitate easy ejection from the mold. They prevent the part from sticking to the mold and minimize the risk of damage during ejection. Follow these guidelines for incorporating draft angles:
Recommended draft angles:
Generally, a draft angle of 1-2 degrees is sufficient for most parts. However, complex or textured surfaces may require larger draft angles.
Consider part geometry:
Evaluate the part geometry and incorporate draft angles in areas where they will not affect the part’s functionality or aesthetics.
Draft angle consistency:
Maintain consistent draft angles throughout the part to ensure uniform ejection and avoid undercuts.
D. Considering parting lines for mold alignment.
Parting lines, where the mold splits into two halves, are crucial in injection molding design. Proper consideration of parting lines ensures proper alignment of the mold and prevents mismatched surfaces. Here are some guidelines:
Design for ease of alignment:
Incorporate features that aid in the alignment of mold halves, such as alignment pins or keyways.
Minimize cosmetic impact:
Position parting lines in areas that will minimize their visibility on the finished part.
Avoid critical part features on parting lines:
Parts with critical features should be designed to avoid parting lines intersecting those areas, as it may affect functionality or aesthetics.
By following these design guidelines for injection molding, designers can optimize the moldability, manufacturability, and functionality of the parts. Considering uniform wall thickness, gate placement, draft angles, and parting lines will contribute to an efficient injection molding cycle and high-quality injection molded parts.
IV. Key Elements of Injection Molding Design.
A. Material selection and its impact on the process
Material selection plays a vital role in injection molding design and has a significant impact on the overall process. The choice of plastic material depends on the desired properties of the finished part and the requirements of the application. Consider the following factors:
Material properties:
Different plastics offer varying characteristics such as strength, flexibility, heat resistance, chemical resistance, and appearance. Select a material that best meets the requirements of the part’s functionality and aesthetics.
Material behavior during molding:
Each plastic material has a unique flow and cooling properties. Consider the melt flow rate, viscosity, shrinkage, and warpage behavior to optimize the molding process.
Compatibility with the mold: Ensure the selected material is compatible with the mold material and surface finish. Certain plastics may require specific mold treatments or coatings to achieve desired part quality.
B. Design considerations for the part itself.
Designing the part itself is a critical element of injection molding design. Here are key considerations to optimize part design:
Wall thickness:
Maintain uniform wall thickness throughout the part to ensure consistent cooling and minimize defects like sink marks and warping.
Fillets and radii: Incorporate fillets and radii in sharp corners and edges to reduce stress concentration and prevent part failure.
Undercuts and features:
Minimize undercuts in the design to simplify the mold-making process. If undercuts are necessary, include additional features like side-actions or lifters.
Functional requirements:
Design the part to meet its intended functionality, including considerations for mechanical properties, assembly requirements, and surface finish.
C. Mold design and its significance.
Mold design is a crucial element in injection molding design that directly impacts part quality, production efficiency, and overall cost. Consider the following factors:
Gate location and type:
Determine the optimal gate location and type to ensure proper material flow, minimize pressure drop, and avoid part defects.
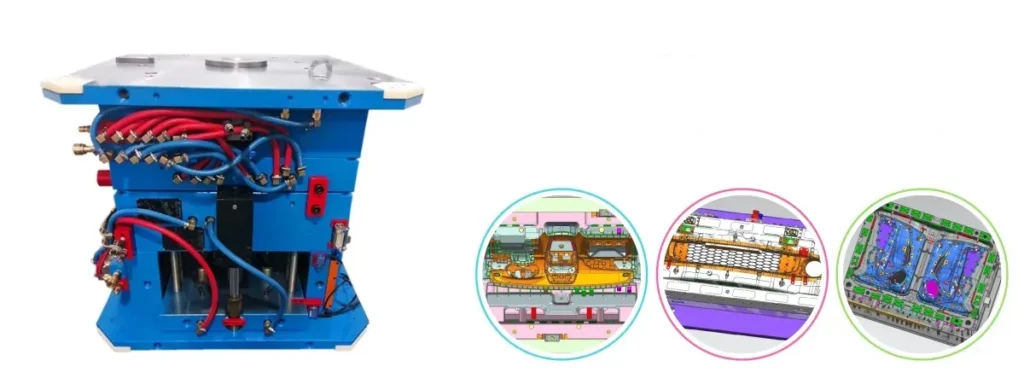
Cooling system:
Design an efficient cooling system with properly placed cooling channels to control part cooling rates, reduce cycle times, and prevent warpage or sink marks.
Venting:
Incorporate proper venting to release trapped air during injection, preventing defects like burning or incomplete filling.
Ejection system: Design an effective ejection system using ejector pins or plates to facilitate easy and consistent part removal from the mold.
D. Understanding the injection molding machines.
Understanding the injection molding machine is essential for successful injection molding design. Consider the following aspects:
Machine capacity:
Ensure the machine has adequate clamping force, injection capacity, and control capabilities to handle the specific part requirements.
Process parameters:
Understand the process variables, such as injection speed, pressure, and temperature, to optimize part quality and cycle times.
Material handling:
Familiarize yourself with the machine’s material feeding and melting system, as it directly affects the material’s consistency and flow during the injection.
By comprehending these key elements of injection molding design—material selection, part design, mold design, and the injection molding machine—designers can optimize the process, enhance part quality, and achieve efficient and cost-effective production of high-quality plastic injection molded parts.
V. The Four Stages of Injection Molding
A. Clamping stage: Securely closing the mold
The clamping stage is the first step in the injection molding process. It involves securely closing the mold using the clamping unit of the injection molding machine. The purpose of this stage is to hold the two halves of the mold together under high pressure during the injection process. The clamping force applied ensures that the mold remains closed and tightly sealed to prevent any leakage of molten plastic.
B. Injection stage: Introduction of molten plastic
The injection stage begins once the mold is securely closed. In this stage, the injection molding machine’s injection unit melts the plastic material and injects it into the mold cavity. The plastic material, in the form of small pellets or granules, is fed into the machine’s hopper. It is then conveyed to the heated barrel, where it is melted by the reciprocating screw. Once the plastic material reaches the molten state, it is injected into the mold at high pressure through the nozzle and into the mold cavity.
C. Cooling stage: Solidification and cooling of the part
After the molten plastic is injected into the mold cavity, it starts to solidify and cool down. The cooling stage is crucial as it allows the plastic material to take the shape of the mold cavity and harden into a solid part. During this stage, the mold’s cooling system, typically consisting of cooling channels, helps extract heat from the molten plastic, facilitating the solidification process. The cooling time is determined by various factors, including the material type, part thickness, and complexity.
D. Ejection stage: Removing the molded part from the mold
Once the plastic part has sufficiently cooled and solidified, the mold opens, and the ejection stage begins. Ejector pins or plates, located within the mold, are activated to push the molded part out of the mold cavity. The ejection system ensures the part is released from the mold without causing any damage. The molded part is then ejected from the mold and collected for further processing, assembly, or packaging.
The four stages of injection molding—clamping, injection, cooling, and ejection—are integral to the overall process. Each stage contributes to the successful production of high-quality plastic parts. Proper control and optimization of these stages help ensure consistent part quality, minimize cycle times, and maximize overall efficiency in the injection molding process.
VI. Exploring Common Terms and Keywords in Injection Molding Design.
A. Plastic injection molding basics
definition of any terms
- Injection Molding: A manufacturing process that involves injecting molten plastic material into a mold cavity, allowing it to cool and solidify to form a desired part shape.
- Mold Cavity: The void or hollow space within the mold that defines the shape and size of the injected plastic part.
- Wall Thickness: The thickness of the plastic material in different sections of the molded part. Maintaining uniform wall thickness is important to ensure consistent cooling and minimize defects.
- Gate: The entry point through which the molten plastic material is injected into the mold cavity. It determines how the material flows into the mold and affects part filling and cooling.
- Parting Line: The line where the two halves of the mold come together. It defines the separation point of the mold and can leave a small visible line on the finished part.
- Ejector Pins: Metal pins or plates within the mold that are used to push the solidified part out of the mold cavity during the ejection stage.
- Draft Angles: Tapered angles incorporated on vertical surfaces of the part to facilitate its ejection from the mold. Draft angles help avoid undercuts and allow for smooth removal.
- Sink Marks: Depressions or indentations that can occur on the surface of the molded part due to uneven cooling or shrinkage. They can be minimized by maintaining uniform wall thickness and optimizing cooling.
- Molded Part: The final product is obtained after the plastic material has been injected into the mold cavity, cooled, and solidified.
- Gate Location: The specific point on the part where the gate is placed. Proper gate placement ensures even material flow and helps prevent part defects.
- Mold Design: The process of creating the mold that defines the shape and features of the final part. It includes considerations such as gating, cooling, venting, and ejection systems.
- Material Cooling: The process in which the molten plastic material solidifies and cools within the mold cavity to form the desired shape of the part.
- Minimum Wall Thickness: The thinnest section of the molded part. It is important to ensure the minimum wall thickness is not too thin to avoid issues such as warping, sink marks, or insufficient structural integrity.
- Runner System: Channels within the mold that deliver molten plastic material from the injection point (gate) to the mold cavity. It helps distribute the material evenly and can be removed from the final part during post-processing.
- Tooling Costs: The expenses associated with the design, manufacturing, and maintenance of the injection mold. Tooling costs can vary depending on factors such as mold complexity, number of cavities, and desired quality.
Understanding these common terms and keywords in injection molding design is essential for effective communication and comprehension of the injection molding process. By familiarizing themselves with these terms, designers and manufacturers can collaborate more efficiently, optimize their design choices, and achieve better results in the production of high-quality plastic parts.
Conclusion
Conclusion Injection molding design is an intricate but essential process that necessitates careful consideration of materials selection, part design, mold design, and overall machine setup. By adhering to design guidelines and incorporating key elements discussed herein, manufacturers can optimize the injection molding process, and increase quality while decreasing defects while improving production efficiency. By continuously refining their design processes with evolving trends and updates they remain at the forefront of injection molding technology and meet various industries’ requirements for plastic parts production.